As SharePoint consultants and SharePoint integrators, we find and are constantly trained on how to best use the SharePoint platform.
If you do not know, SharePoint has been sold since 2001. The Microsoft platform was created to manage company documents. These days it is packed with benefits for your business.
Our guru project manager has been learning about SharePoint and these are some the practical and simple tips and tricks he has found through training and by heads-down, hard-work with customers.
SharePoint Settings
 This symbol is important.
When you see the settings icon in the upper right corner of your screen, it gives you access to all of the site contents and all the specific site settings for THAT specific page.
“I always thought it brings you to the same set of contents and settings,” HingePoint Project Manager Brendan Desjardins said. “But even though the top nav doesn’t appear to change, clicking on site settings or contents directs you to the appropriate lists based on the page you navigated from.”
Enhancing Look and Accessibility of Your Workspace
Customize Your Page Banner
Personalizing your SharePoint site with a customized page banner is like hanging your company’s flag at the entrance of your digital domain.
- Access Site Settings:
- Navigate to your SharePoint site where you want to customize the page banner.
- Click the gear icon (⚙️) in the top right to open the settings menu.
- Select ‘Change the Look’:
- Choose “Change the look” from the settings menu to access customization options.
- Choose ‘Header’:
- Within the “Change the look” options, select “Header” to customize your site’s page banner.
- Customize Your Header:
- You’ll find options to change the layout, background image, and text alignment in the header customization section. You can also adjust the site logo and navigation style here.
- To change your banner’s background image or color, select the appropriate option and choose from the available presets or upload a custom image.
- Adjust the size and appearance of your header to match your brand’s style and preferences.
- Apply and Save Changes:
- Once you’ve made your adjustments and are satisfied with the new look of your page banner, click “Save” to apply the changes.
- Your SharePoint site will now display the customized header, reflecting your personalized branding and style.
Consistent Brand Colors
Ensuring consistent brand colors across your SharePoint pages is like weaving a thread of continuity through your digital estate. This consistency is not just about aesthetics; it’s a visual language that speaks of your identity, values, and professionalism your company stands for. Imagine walking through a series of interconnected rooms where each space, though distinct in its purpose, carries the essence of your brand’s identity through the harmonious use of colors. This reinforces your brand’s presence, making every click and scroll through the SharePoint site an affirmation of your company’s ethos.
Through these customizations, SharePoint evolves from a standard office tool to a reflection of your business’s heart and soul. Each tweak and adjustment is a step towards creating a digital workspace that meets the practical demands of day-to-day operations and elevates the platform to a canvas that showcases your company’s unique brand and culture.
Implement Image Tags in Documents
Embedding image tags within documents transforms SharePoint from a mere repository of files into a gallery of information and context.
Applying Tags:
- Choose a Photo: Select the pic to tag or whose tags you want to edit.
- Edit Tags: Click on “Edit tags.”
- Modify Tags: To add a tag, type the new tag. To remove a tag, click the “x” next to the tag you want to delete.
Viewing Photos by Location tags:
- Go to All Photos View: Photos taken on the same date are grouped.
- Use Location Tags: Click on the location tags next to a date to view all photos from that location. Be mindful of privacy when sharing these photos.
Creating an Album:
- Navigate to Photos: On the OneDrive website, go to the “Photos” section.
- Go to Albums: Click on “Albums.”
- Create New Album: Click “New album,” then enter a name for your album.
- Add Your Photos: Select the photos you wish to add and click “Add album.”
Out of the Box Web Parts
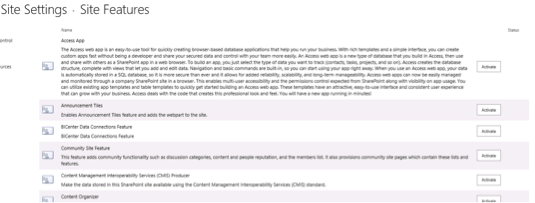
Site features is a new component for 2013 and 2016 Sharepoint. Navigate to Site Settings under Site Actions: Manage Site Features. You will be presented with a list of the out-of-the-box web parts that you can activate:
- The Business Intelligence Center is new for 2013 and 2016 which allows you to connect BI Dashboards and BI Data to the Sharepoint
User can adjust settings for different functionalities at the Site Level and the Site Collection Level - Library Settings holds all of your metadata and provides you with the ability to implement versioning history, approvals, and document templates
- Best practice: do not create more than 8-12 subsites below the top level.
Other Cool Facts
- In Sharepoint 2016, you now have the ability to upload files with special characters in the title.
- Users can go to Recycle Bin to restore any deleted contents.
- Users can go to Site Settings/ Look and Feel to change how SharePoint looks out of the box. Change formatting, background pictures, and color schemes. It also has many preloaded templates available to make Sharepoint more exciting. You can also upload a picture to the Sharepoint title in the top navigation.
SharePoint is nothing without customization. Akin to designing your office space it’s important to tailor your SharePoint deployment with a unique atmosphere that resonates with your company’s culture and values. This allows your workspace to not only function with efficiency SharePoint is known for, but also to mirror the distinct personality of your organization. Here are some quick ways to make your SharePoint represent your team better.
Taking Action
Now that you’re equipped with these insights, it’s time to explore and implement these strategies within your SharePoint environment. Each tip represents an opportunity to enhance your platform’s functionality, improve user engagement, and streamline business processes. Dive in, experiment, and witness the transformation in your SharePoint experience.
Learn how we can help you with SharePoint
Learn how we can make your SharePoint better or contact us for a quick, free consultation.
About HingePoint
HingePoint covers the AEC Industry and is the author of The AEC Industry 4.0 Report and the Autodesk Industry Report 2017. HingePoint helps construction and real estate development companies take control of their company’s information. We combine systems, software, and data so all company information can be seen and accessed from one screen, like a smartphone or computer.
HingePoint provides Procore, SharePoint and Salesforce consulting for Commercial Real Estate and Construction companies. HingePoint also helps the AEC industry with development & integration of AutoDesk and Procore products with enterprise systems. We are a trusted partner with over 25 years experience of systems development and integration work in the AEC industry. Our clients range from top hotel brands and restaurant chains to AEC firms and real estate developers and Facilities Management. We provide BIM with ROI. Results Guaranteed…Literally Guaranteed.